From a home library so expansive that it requires a rolling library ladder to color-coded electronic cords so the family can know whose is whose, you love to keep things organized. And since the kitchen is considered the heart of the home, you want to do everything you can to make it both beautiful and functional. A kitchen renovation with new energy-efficient appliances and cabinet doors with a gorgeous wood veneer is a great place to start. However, to operate and cook efficiently, it needs to be organized just as well, complete with cabinet hardware, organizers and storage bins to contain your assortment of foods and cookware.
Not sure where to start? Here are six cabinet organization tips, tricks and tools to ensure everything has its place so you find what you need quickly.
#1 Start By Decluttering
When it comes to kitchen organization, the most helpful trick you can do is simply declutter your cabinets and pantry. Be honest – there are probably expired food items tucked in the far back and kitchen gadgets you have never once used. So go through each cabinet and drawer, purging them and opening up space for more elegant and refined storage solutions. As you declutter, sort items to be donated or trashed, getting rid of items one-by-one. Only then will you be ready to go through your “keep” pile.
#2 Categorize Your Items

With only your “keep” items left, sort and organize. Consider how and where the item is used most frequently. For example, if it’s containers of coffee and sugar, they should go in a cabinet close to your coffeemaker. Another example would be to keep cooking utensils closest to the stove. Ultimately, it’s all about how you function in the kitchen, so take that into consideration.
The first step in categorizing is to separate foods from the rest of the cookware, dinnerware and tools. Then, you can break down each further, sub-categorizing further from there. What kind of sub-categorizing? Sort the canned foods, baking ingredients, spices and pasta/rice, for example. For the cookware, these can be sorted by pots and pans, utensils and cutting boards and knives. In the end, you should be able to see how much of each subcategory you have so you can better determine where to designate them when you place them back.
#3 Designate Items to Cabinets
With your cabinets empty and items all sorted into their piles, your next step is to designate a space for your items. Again, consider how you go about using your kitchen daily and allocate specific areas for activities. For instance, you might want to keep the mugs above the coffeemaker. Look at the cabinets with new eyes, allowing yourself to make changes for the better.
Once you have a general idea what cabinets the items will go inside, think of how to position them. For example, if you only break out that giant pot for stews and soups in the fall, keep it toward the back of a cabinet, bringing your basic pots and pans toward the front. The same goes for utensils and foods (although don’t forget they’re back there). You could even choose to free up cabinet space, keeping cooking utensils in a countertop container, or by using a wall-hanging magnetic knife holder. To make organizing and accessiblity better add in cabinet pullout shelves lincoln.
#4 Add Heavier Items to Lower Cabinets

Lower cabinets are suitable for storing heavier items, such as pots and pans. Beneath your prep station, store kitchen appliances you don’t use too often. However, if you make a smoothie every morning in the blender, this can be set directly on the countertop.
Near the stove (and oven, if they are separate units), store items such as pot, pans and baking sheets. Since these items tend to be bulky and oversized, make the most of your space by stacking or nesting them. If you have decent pots like enameled Le Creuset or Staub, be sure to use a felt pad or plastic protector between each to avoid scratches. You can also separate the lids, standing them vertically to maximize lower cabinet space.
This is also the perfect spot for mixing bowls and cutting boards. An ideal location would be near the dishwasher or a drying rack. Speaking of the dishwasher, keep the detergent close by in a nearby cabinet, like under the sink, along with all the other cleaning supplies. If you have children, be sure to childproof this space, too! If the cabinet beneath your sink is spacious, take advantage of it and add a few shelves or racks, allowing you to swing or slide it out to have everything within reach on cleaning day. One good tip is to also keep these items below in case of a plumbing issue or leak. It goes without saying, but never store chemicals above food.
#5 Add Go-to Lighter Items to Upper Cabinets
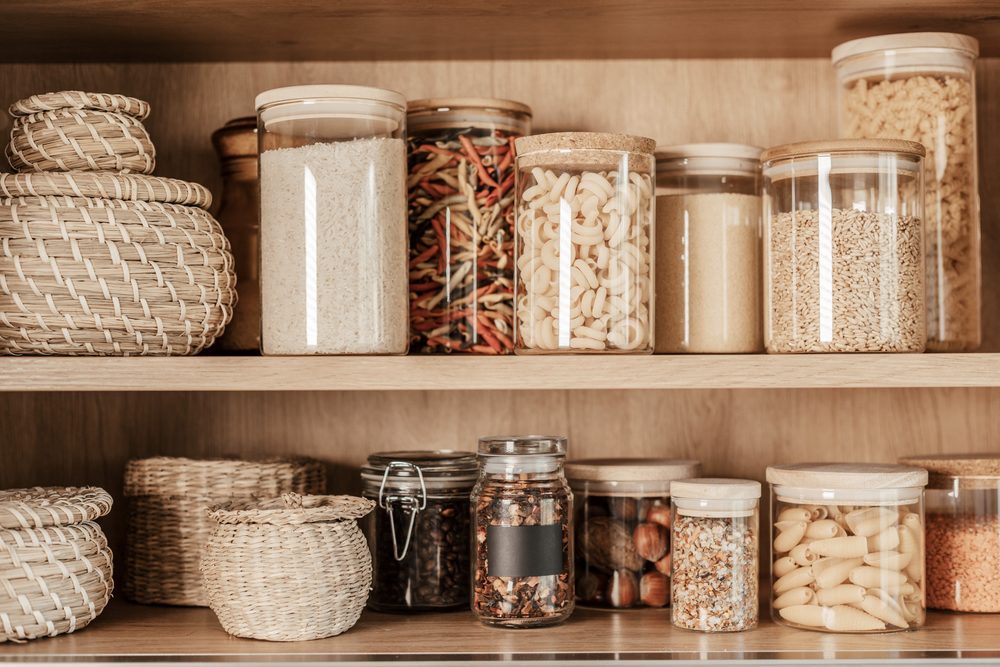
In the upper cabinets, you’ll add everything else: food, glasses and dishes, cookbooks, etc. Food should always be kept high in upper cabinets, discouraging insects and critters. A good rule of thumb is to store food above your prep station, making it accessible and reachable right in front of you as you make meals. If you happen to have a pantry, be sure to use that first! This way, it allows you to use upper cabinets for dishware and glasses. Invest in bins and containers to organize bulky, bagged foods like rice, pasta, dried beans and more. Get a lazy Susan rack for spices, rotating it to find that one ingredient quickly.
Now that you have your food stored away, focus on the glasses and dishes. As mentioned, designate them to areas that make the most sense for you — mugs over the coffeemaker, dishes over the dishwasher — that sort of thing.
#6 Continue to Keep Your Cabinets Organized
Once everything is put away, give it a week or so to get used to the new arrangement. You may find that you preferred a previous arrangement better. If you need to adjust and tweak your newly organized cabinets, then, by all means, do so.
However, after some time has gone by and you begin to fill the pantry or shelves with food, take a few extra steps to ensure it’s maintained from here on out. Here are a few additional tips and tools to continue keeping your cabinets clean and organized:
- Label the Containers – Use a labeling system with your containers so everyone knows where the food goes. It can be a glass container with a chalk label or just some clip-ons. You can even add clip-on tags to the cabinet doors.
- Keep It Tidy – When placing food away, turn labels facing toward you so you’re not reaching blindly through the cabinet. When it comes to glassware and dishes, organize them by size or style instead of stashing them away disheveled.
- Declutter Regularly – Make sure to declutter regularly, tossing out expired foods or items you plain forgot you even had. With any decluttering project, a good rule of thumb is if you haven’t used it in a year, it should be donated.
With these tips and tricks, you should be well on your way to completely organized kitchen cabinets. However, keep in mind that many of these tricks work for other areas of the home as well, such as bathroom cabinets, linen closets and garage shelves. Happy organizing!