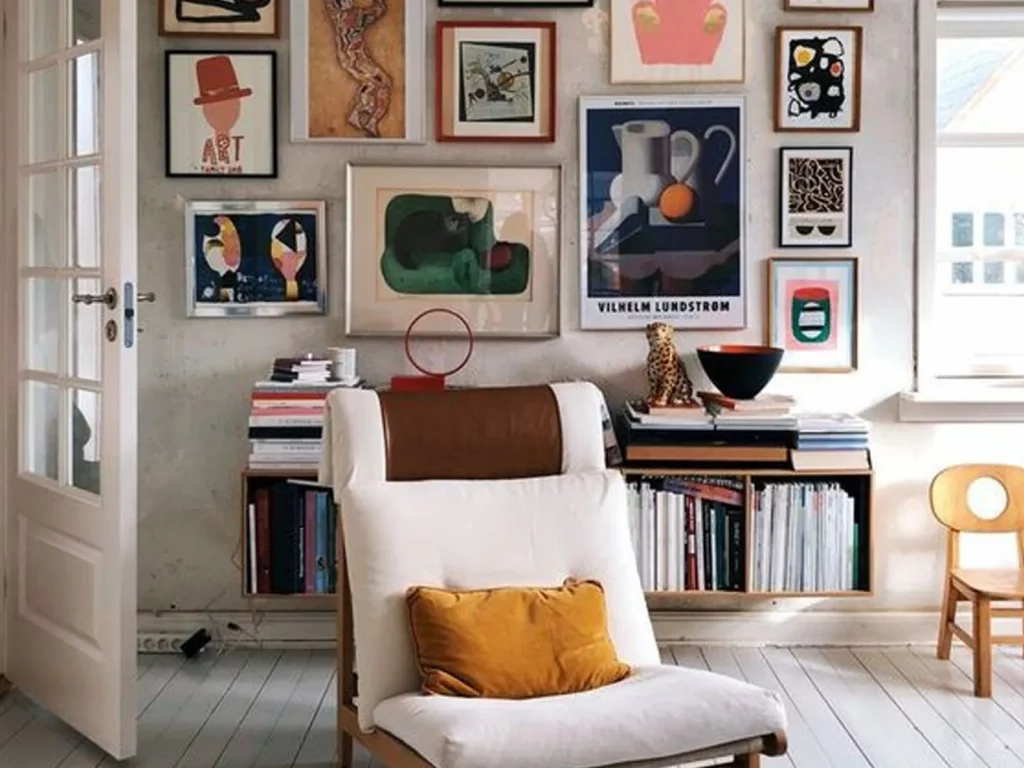
Over the past few years, gallery walls, also known as picture walls, have become increasingly popular since they are one of the simplest ways to freshen your interiors, modify ordinary walls, create a focal point in your home, and infuse your living space with character and personality. Creating a gallery wall design in your home can be accomplished by painting or wallpapering a highlight wall. You may put them everywhere you like, from the entrance to the living room and even on the wall of your staircase.
It is now, says Clare Moreton, a picture expert at the CEWE, “that you should consider creating a gallery wall in your home if this is something you’ve been putting off for a while.” In the author’s words, “creating a gallery wall does not have to be complex or time-consuming.” Making a collection of your favorite pieces that also express your uniqueness is the goal. Check out several styles and types of wall art – whether it’s a combination of bold block color prints, bright zany patterns, typography designs, or your favorite family images – and see what works best for you.
There are two primary types of gallery wall design: those that are framed and those that are not. It is possible to design your own gallery wall by utilizing your own photographs and artwork, as well as by acquiring picture frames that are the suitable size for the exhibition.
Purchase a carefully curated collection of framed wall art prints (usually with a theme, such as botanical or landscape photographs) that can be easily hung on the wall once they have been assembled in the desired location. After that, ask yourself some questions.
Is it important to you to be able to display your most valued works of art, beloved prints, or those special family milestones such as birthdays, weddings, and new arrivals on your walls? Well, you’re in for a treat because our pals over at Artfinder take us through the steps of planning a gallery wall
How to Design Your Perfect Gallery Wall
1. Amass as much knowledge as you reasonably can.
Planning a gallery wall starts with organizing your interests and assembling a collection of products that interest you, while also considering the convenience of a versatile rail hanging system to effortlessly showcase your art pieces. Examples include original artwork, handcrafted prints, and photographs. Make an estimate of the size of your possible collection as well as the layout you wish before you begin collecting.
Design your own gallery wall perfectly by answering these questions. Do you want to be certain that they’re all the same height and width as one another? Alternatively, do you want to work with a variety of different sizes? You can get inspiration on the internet, in your favorite cafes and restaurants, or at home shows and exhibitions to get you started on your project.

2. Create a central topic for your project.
Whenever you’re satisfied with your gallery wall design choices, choose your favorites and group them together based on themes such as individuals or places or unforgettable occasions, or any other combination you can think of. Select art or prints in colors that compliment your existing decor or that complement the overall sense of the space in which you wish to display them while making your selection. Instead, select only those that make you joyful! It’s why you chose to design your own gallery wall after all.
3. Is it preferable to be even or odd in a situation?
Decide whether odd or even numbers are more effective in achieving your goals. Although even numbers can perform well when arranged in regimented groupings of the same size in some situations, odd numbers perform better when arranged in more random configurations or collections of the same size.
4. Take an accurate measurement.
You should first determine how much open wall space you have and then arrange your collection on the floor. Take a step back and think about them all at the same time (allow a bit of space between them for the frames). Is there anything in particular that sticks out as being wrong? If you answered yes, then you should remove it. Or do you believe there is a place for one or two more? Examine the situation from every viewpoint and make a list of all of the possible combinations to perfectly design your own gallery wall.
5. Choose your frames from the various possibilities that are offered.
Following approval of the proposal, proceed to place your order for the frames. Decide if you want them to be a seamless continuation of or contrast with the wall, or whether you want them to be a focal point on their own. Select the color scheme you want for your flowers in your gallery wall design. Do you want them all to be the same color or do you want a selection of different colors? In Scandi-style interiors, the usage of a white or neutral picture frame is excellent, however black picture frames are more acceptable for contemporary or industrial-themed interiors.
Another option to design your own gallery wall like a pro is to put together a collection of frames in a single hue but with a variety of styles; this, too, can add visual interest. Is it possible that they will come in a variety of shapes and sizes? In the event that you are wanting to purchase artwork, it may be more practical to purchase pieces that have already been framed or are ready to be displayed on box canvases.
6. Making a decision on the design layout.
Do you like precise rows of flowers or a more natural-looking arrangement of flowers? Evaluate your gallery wall design and each of your original photographs to determine whether or not the framed parts are still appropriate for your overall design. Is there anything you’d like to exchange? When you are satisfied with the results, take another photograph.

7. Hanging and showcasing your craft
The completion of this project will necessitate the use of several handyman tools. Yes, planning a gallery wall is this easy and exciting! For those who are new to the process, some people even go the extra mile and design paper templates for themselves, which can be really helpful. In addition, you’ll need a pencil and rubber, a ruler, and a wall filler in the event that you make a mistake.
Lightly sketch the upper corners of the frames on the walls where they will be hung, paying particular attention to the upper corners. To indicate how much lower down you want your nail holes to be, measure the picture frame and write a mark on it to indicate how much lower down you want them to be. If you start banging on them, you’ll soon be able to get them all to stand. To ensure that everything is square and level, use a spirit level to check everything periodically.
8. The final and final appearance
You should maintain a safe distance, enjoy yourself, and bask in the magnificence of your creation. Congratulations! You are finally able to design your own gallery wall.
Maintaining your gallery’s flexibility allows you to quickly change out old favorites for new ones whenever you want. As for art prints, it is possible that you will want to switch them out for the new season in order to create an autumnal or winter motif. Simply choose what you want to remove and either remount it or replace it with a piece that is the same size as the item you removed from its mounting.