We often need to paint fences when we build a new fence or give a new look to the older fence. Painting a fence is not a tough job, but people avoid hiring professional services due to time-consuming. If you have an electric HVLP paint sprayer, you can get your fence paint’s quick and perfect finish.
You may find it more accessible, but for the perfect fence painting experience, it is more essential to learn the proper ways to paint a fence with an electric HVLP paint sprayer. Stay with me to learn fence painting with an electric HVLP paint sprayer through step by step guide.
Why should you paint a fence with an electric HVLP paint sprayer?
Most of us think that the purpose of painting a fence is to give it a beautiful look. Yes, it is correct, but there are many other benefits of painting a fence with an electric HVLP paint sprayer.
After painting the fence, you provide an extra layer over your fence to protect it from rain, wind, and sun effects. It not just keeps it in good condition but also enhances its lifespan.
Step by step guide to painting a fence with an electric HVLP paint sprayer
Step one- Arrange tools and Materials
Before starting your fence painting project, you should arrange all the necessary tools and materials to enjoy a smooth fence painting experience. Things need to know.
Electric HVLP paint sprayer- a good quality sprayer can quickly finish your fence painting project within 30 to 50 minutes.
Paint- Arrange a good quality and colored paint that perfectly match or give a better look with your other arrangements or décor
Safety gears- gloves and eye-protector, you can also wear the specific suit for painting.
Masking tape- to mask off the areas where you do not want to paint
Stirring stick- to stir and properly mix the paint
Cleaning rag- to clean the paint and dirt etc
Paintbrush- necessary for the final touch
Paint thinner- for preparation of paint according to your project
Two medium-size buckets- one for cleaning and the other for priming purposes
Paint cleaner- For cleaning of paint sprayer after use

Step two- Prepare fence for paint
You may have some hurdles near the fence, such as plants close to the fence or wires or tree twigs. If you do not remove such things, it will be hard for you to paint the fence. So first, remove all such hurdles near the fence to make it easier for you to move and paint on the fence.
Step three- Prepare paint
Prepare paint material according to the type of paint you are using. Mainly water-based paints are used. You can thin the paint by adding water or thinner. But keep in mind, add water or thinner gradually and stir the paint material until you get the right thinning for paint material. Prepare only the required amount of paint.
Step four- Fill sprayer cup with paint
Unscrew the paint sprayer cup and fill it with prepared paint. While filling the cup, fill it a little down from the cup upper corner. Filling the sprayer cup may cause leakage or loss of paint.
Step five- Make adjustments to the HVLP paint sprayer
It would help if you made three basic adjustments for the smooth and proper paint flow from an electric HVLP paint sprayer.
The first is the fluid control knob; the second is fan control for air pressure and valve adjustments. The different paint sprayer has different ways of adjustment, so read the user manual to make the proper adjustments.

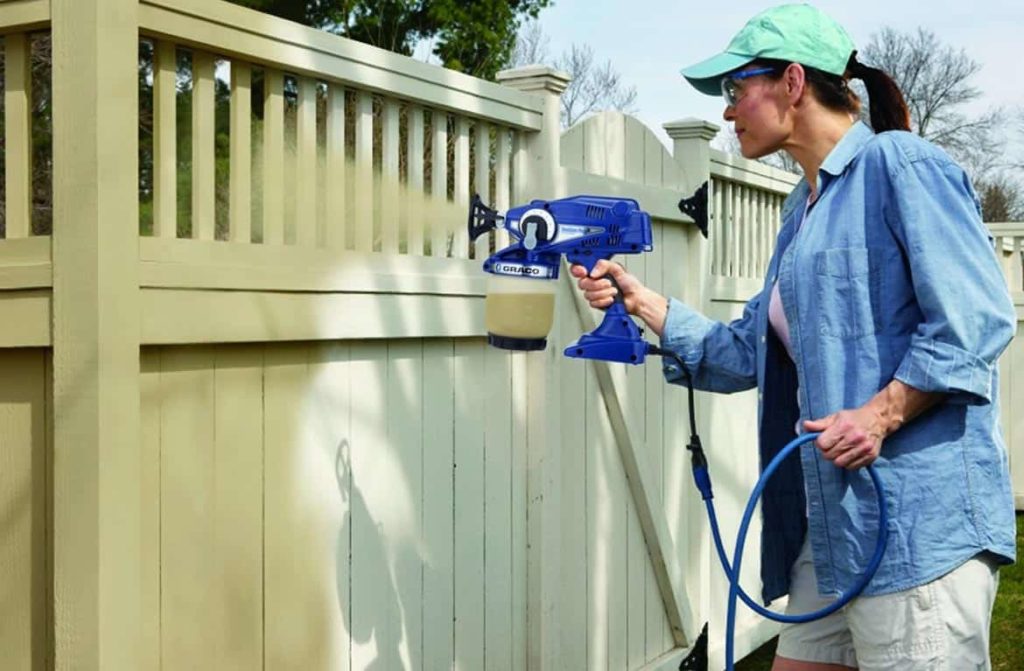
Step six- Paint fence
Painting through the electric HVLP paint sprayer is pretty easy; by turning on the electric paint sprayer, you can get an excellent paint finish for your fence. Before starting paint over the fence, it is good to practice it over a rough surface to protect from any unwanted instance.
Once everything is correct, start painting but do not paint on the fence’s upper portion because you cannot get the right finish on the upper areas of the fence with an electric HVLP paint sprayer.
Step seven- Repeat coat if needed
Once you have done the first coat, check the fence paint; if you see gaps or thin areas, repeat another coat for the fence. If you have quality paint and paint sprayer, then very often you need another coat.
When repeating another coat, it is better to change the angle of the paint sprayer nozzle to ensure covering of remaining or thin parts. Suppose you paint from upward to downward, then repeat the coat from downward to upward.
Step eight- Paint fence top
Have you done fence painting with an electric HVLP paint sprayer? No need to paint the fence top that you have left. For the fence, top use the paintbrush to paint perfectly and give a nice finish to your fence.
Step nine- Check fence paint
Once you have completed your task, check it from every angle to ensure that you have done your job well. If there is no need to apply paint, leave your fence dry, protect your pets and kids from getting closer, or touch the fence.
Step ten- Clean Electric Paint Sprayer
Please switch off the electric paint sprayer, and clean the sprayer to store it. For cleaning, first of all, remove all the remaining paint from the sprayer cup and clean the cup with a paint cleaner chemical. Also, check the other parts and do the cleaning if necessary and leave the sprayer in a dry place to dry.
Conclusion
Painting a fence has become a more straightforward job now with an excellent electric HVLP paint sprayer. Even a beginner can paint a fence by following the above simple steps. No worry, you can easily paint a whole fence in just a couple of hours.
Plan your weekend or any day now, and paint your fence perfectly. But do not forget to arrange safety gear, tools, materials, and follow our instructions if you want fine finishing.