
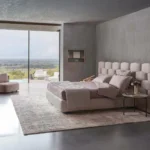
Bedroom Designs, Lighting Decor Ideas
Table Lamp: Why the Right Night Stand Lighting Completes Your Bedroom


Most popular

Architect Design
Top 10 Singapore Architecture Firms To Hire In 2026


Home Improvement
A Look at the Pests EcoShield Technicians Handle

Home Improvement
Why Chattanooga Homes Need Year-Round Pest Prevention

Bedroom Designs, Lighting Decor Ideas
Table Lamp: Why the Right Night Stand Lighting Completes Your Bedroom

Bedroom Designs
Bedroom Design for Teenage Boys


Basement Designs
How to Spot and Fix Basement Moisture Before It Damages Your Home

Wall Decals Designs
Why Large Format Stone Wall Panels Are Transforming Modern Interiors

Choosing Professional Roofing Services in Florida: What Homeowners Should Look For
Choosing the right roofing contractor is one of the most important decisions a Florida homeowner …

The Ultimate Homeowner’s Guide to a Roof That Lasts for Decades
A long-lasting roof isn’t luck. It’s the outcome of consistent maintenance, smart material choices, and …

How Rain Gutter Services Protect Your Home’s Foundation
When homeowners think about protecting their house, attention is often focused on roofing, siding, or …

Avoiding Hidden Hazards: Why Every Builder Needs Concrete Scanning
Construction projects often involve cutting, drilling, or coring through concrete structures. While concrete is durable …

How North Carolina Weather Affects Your Home’s Exterior (And What to Do About It)
North Carolina is a beautiful place to call home, but if you’re a homeowner in …

Pumpkins and Fall Decorating
Embracing Fall: The Joy of Pumpkins and Seasonal Decorating As the air turns crisp and …

DIY Home Decor Tips for New Homeowners
Moving into a new home is an exciting milestone, but it can also be overwhelming …

Top 10 Singapore Architecture Firms To Hire In 2026
Let me tell you why most “top 10” architecture lists are completely useless. They rank …

Authority Website Guest Post Placements for Stronger Search Visibility
Rank Bytes is a results-driven digital marketing agency specializing in premium guest posting, strategic link …

A Look at the Pests EcoShield Technicians Handle
EcoShield Pest Solutions provides treatment and management services for a wide range of pests across …

Why Chattanooga Homes Need Year-Round Pest Prevention
Homeowners often associate pest activity with warm summer weather. Mosquitoes become more noticeable outdoors, ants …

Table Lamp: Why the Right Night Stand Lighting Completes Your Bedroom
Lighting plays a vital role in creating a comfortable and inviting home. While ceiling fixtures …

Bedroom Design for Teenage Boys
Are you struggling with how to decorate a teenage boy’s bedroom? That is completely understandable. …

iSiDi: The Ultimate AI Platform for Architects, Interior Designers, and Architectural Visualization
BiSiDi is redefining the future of AI for architects, AI interior design tools, and architectural visualization platforms by making …

How to Spot and Fix Basement Moisture Before It Damages Your Home
Basement moisture is one of those home problems that punishes delay. A small crack or …
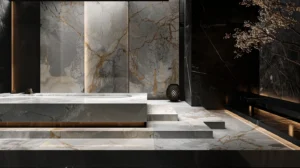
Why Large Format Stone Wall Panels Are Transforming Modern Interiors
Large-format stone wall panels have become one of the biggest trends in modern residential and …

White Oak Kitchen Cabinets Are Everywhere Here Is What Is Driving the Obsession
Walk into almost any newly renovated kitchen today, and there is a good chance you …

The True Cost of Ignoring AC Repairs in Florida’s Heat
When the air conditioning fails on a sweltering summer day, the discomfort hits immediately. Temperatures …

Preparing Your HVAC System for Summer Humidity in Indiana
Summers in Indiana bring a combination of high heat and heavy humidity that can make …

Who Are the Best Options for a Septic System Installation? 4 Options in Oswego, NY
Choosing the right company for installing a septic system in Oswego, New York, can feel …

Home Inspections: What They Reveal About Your Property’s Health
Few actions are as important as the home inspection, whether you are purchasing or selling …

How To Make Your Home Feel Like A Spa
Key Takeaways – Do you want to transform your home into a relaxing spa-like retreat …
Check More Inspirational Decor Ideas
Balcony & Window Interior Design Black & White Interior Brick Wall Chair Design Ideas Fireplace & Mantel Decoration Hot Tub Industrial Interior Design Interior Photography Lamps & Chandelier Decor Mirror Decoration Pillow Decoration Plants Decoration Renovation Rugs & Carpets Interior Design Scandinavian Interior Design Small Space Decorating Ideas Sofa Design Ideas Trends Vintage Decorating Ideas Wooden Interior Design