Every homeowner’s goal is to keep their roof clean and clear of debris and grime. Regular maintenance is the only way to avoid severe damage on your home’s other structures, especially the walls and ceilings, during rainy conditions.
A well-maintained and clog-free roofing system will lead to good drainage and prevent leakage caused by water buildup. Over time, roofs are prone to mold, algae, and moss, particularly if you tend to overlook routine maintenance. These elements have the potential to bring about serious problems that can put your roof at risk for damage. If scrubbing or scraping is the initial task that comes to mind, it’s best to think twice since it can ruin the shingles. So, an option worth considering to keep your roof clean is pressure cleaning.
How A Pressure Washer Works
A pressure washer can effectively deal with stubborn debris buildup, algae, and moss as long as you use the proper pressure level. When using one, always observe caution when using one on all surfaces. When correctly done, the advantages outweigh the risks of allowing debris, mold, and algae to build up on your roof.
During pressure washing, the washer draws water from a hosepipe and propels it via a specialized nozzle at high pressure, with the help of a gas or electric-powered engine. The dual effort of the pump and the nozzle ensures the water ejects at high pressure, removing dirt, debris, grime, moss, algae, and other hard-to-remove deposits on the roof’s surface. When it comes to sourcing top-quality pressure washer , Hotsy of Houston stands out as a trusted provider. Their comprehensive selection of replacement parts and accessories ensures that you have access to the essential components required for your pressure washer’s maintenance and repair needs.
Steps In Pressure Washing The Roof
Whether you’re planning to clean the roof yourself or leave the task to a professional, you must know how to perform pressure washing properly to get the best results.
- Preparation
In most cases, it usually takes a day to clean the roof. However, if you’re dealing with stubborn buildup, such as black mold, it might require soaking the roof with chemicals for a day.
Make sure to remove all tree branches and leaves hanging on the roof. Affix a 35-degree nozzle to the wand. This type of nozzle distributes pressure evenly over a wide area to prevent any damage on the surface.
Fill the tank with an appropriate cleaning solution. Ideally, the cleaning solution should be good-quality, biodegradable, and safe for pressure washers but also suitable for the type of buildup on your roof.
Make sure to test the force of the pressure washer to make sure that the output is suitable for the roof. Don’t forget to wear non-slip, soft shoes if there’s a need to walk around the roof.

- Ladder
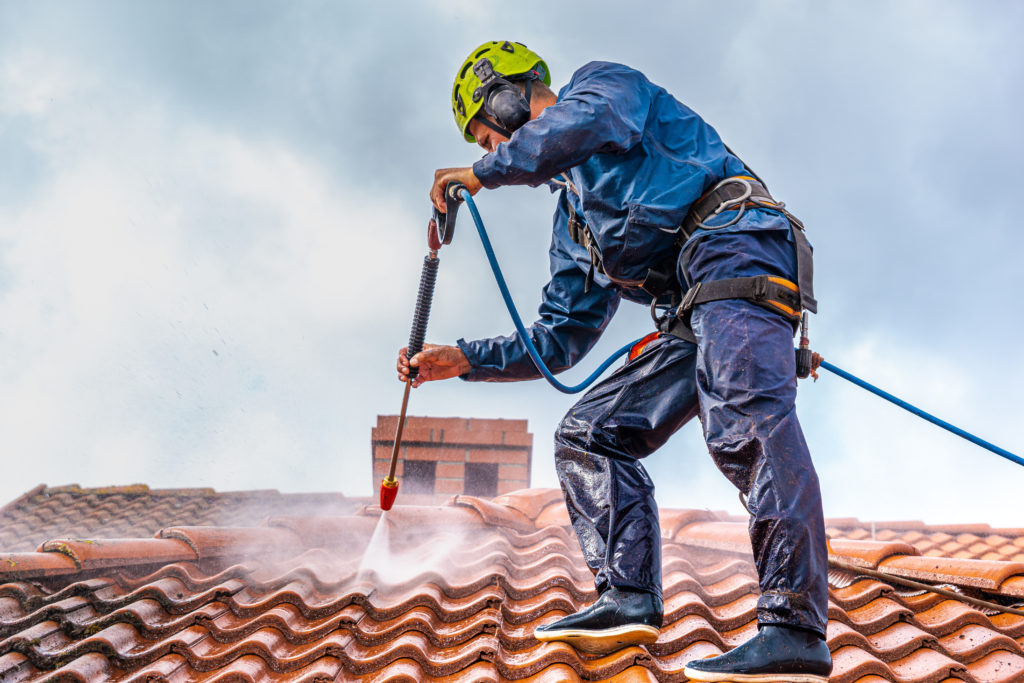
Position the ladder in an area where you can move up the roof without damaging the edges. As you climb the ladder, hold the pressure washer wand. Move to the roof’s highest point, ideally on the side furthest from the ladder.
Turn on the machine and raise the wand to enable any remaining pressure to escape as you face the gutters. Allow the water to run over the shingles and down the roof as you wash them.
Avoid shooting the water towards the upper part of the roof since it’ll drive water below the shingles and into the interior structures of your home. Moreover, the force is likely to tear the shingles off. If the power isn’t enough to remove the debris or growth, position the wand closer to the roof’s surface. If necessary, you can turn up the pressure slightly.
Avoid using more than 1,500 pressure per square inch (PSI). Once you see grit loosening or building up in the gutters, quickly lower the force.
- Washing Process
When cleaning the roof with a pressure washer, you should do it in sections, moving from top to bottom, in a side-to-side motion. The areas you’ll work on should be within comfortable reach. Maneuver the wand in back-and-forth movements. If you want a spotless roof, apply detergent to sections you’re working on and rinse them well. Continue to the next part and repeat the process.
While cleaning, you should be standing on a dry section of the roof since shingles become slippery when wet. Don’t forget to check for any damage while cleaning. Once you have thoroughly washed all the surfaces, move back steadily to the ladder and climb down carefully.
Final Thoughts
Pressure washing the roof is a task you shouldn’t take lightly. If you’re determined to carry out the job yourself, you should carefully follow the proper steps to ensure the best results while staying safe and keeping damage to a minimum. However, if you’re not up for the task, you can hire a professional to do the cleaning for you.