The scenario we see weekly in San Diego
A property manager gets a call at 7:30 AM: water is dripping into a unit below. The source unit says nothing is leaking now. By the time access is gained, moisture has already moved vertically through wall cavities and laterally under flooring. Two units are involved, possibly more. The clock is already working against you.
In multifamily buildings, delay is what turns a manageable mitigation into a six-figure problem — not the original leak.
First 24 hours: what to do immediately (and what NOT to do)
Immediate next steps (do these in order)
- Stop the source
Shut off the fixture, angle stop, riser, or unit water supply. Do not assume the leak “stopped on its own.” - Document moisture before anything is removed
Moisture mapping (walls, ceilings, floors) must happen before fans or demolition. This protects the HOA and clarifies scope. - Open affected walls selectively
In multifamily buildings, water rarely stays visible. Flood cuts are often required even when drywall “looks fine.” - Notify management + insurance simultaneously
Waiting for adjuster approval before drying is one of the most expensive mistakes HOAs make. - Control airflow
Set containment if multiple units or shared hallways are involved. Uncontrolled airflow spreads moisture and odors.
What NOT to do
- ❌ Don’t rely on maintenance staff with box fans
- ❌ Don’t pull baseboards only and assume drying will work
- ❌ Don’t delay access to adjacent or vacant units
- ❌ Don’t start repairs before drying is verified
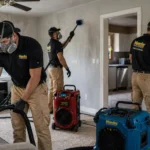
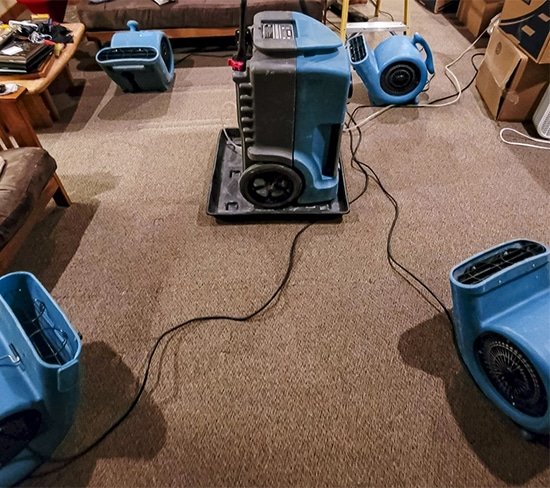
What water damage mitigation actually looks like (step-by-step)
Day 0–1: Investigation + setup
- Moisture mapping across affected and adjacent units
- Infrared + invasive checks where needed
- Containment in shared walls or corridors
- Equipment placement (air movers, dehumidifiers, air scrubbers)
Typical cost (San Diego multifamily):
- Single unit: $2,500 – $4,500
- Two units vertical loss: $4,000 – $8,000
- 3+ units or commercial suites: $8,000 – $15,000+
Day 2–4: Active drying + monitoring
- Daily moisture readings
- Equipment adjustments
- Expansion of drying zones if moisture migrates
This is where costs change — not because of equipment, but because more materials are found wet.
Day 4–7: Dry-out confirmation + clearance
- Materials meet drying standards
- Equipment removal
- Documentation finalized for insurance or HOA records
If drying is not confirmed and repairs start anyway, secondary damage becomes the HOA’s problem, not the carrier’s.
Reconstruction timelines (realistic, not optimistic)
- Cosmetic drywall repairs: 1–2 weeks
- Flooring replacement (matching issues): 2–4 weeks
- Cabinetry or millwork: 3–6 weeks
- Shared systems or risers: longer, depending on access and approvals
The real cost drivers HOAs underestimate
- Delayed access to neighboring units
- Drywall left intact because it “looked dry”
- Insurance scope written without proper moisture data
- Mold discovered after repairs start
- Unit owners doing partial demo before professionals arrive
These don’t just raise costs — they shift financial responsibility away from insurance and toward the HOA or owner.
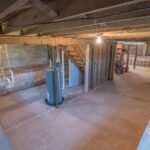
San Diego–specific realities (this matters)
- Coastal humidity slows drying
- Slab-on-grade and podium construction hides moisture
- Older buildings lack modern waterproofing
- Luxury finishes increase tear-out scope
- HOAs often inherit responsibility when origin is unclear
In riser failures or unknown-source losses, cost allocation becomes a legal and accounting issue, not just a repair issue.
When professional help is actually required
You need a licensed restoration contractor (not just maintenance) when:
- Water crosses unit boundaries
- Drywall, insulation, or flooring is wet
- Insurance is involved
- Mold is suspected or visible
- Access coordination is required across units
This is not about upselling — it’s about controlling scope and liability.
Common mistakes that cause mold or insurance problems
- Drying without containment in shared walls
- Starting repairs before dry-out verification
- Assuming mold testing answers “where” contamination is
- Letting owners hire separate contractors mid-mitigation
- Missing documentation during the first 48 hours
FAQs (written for schema support)
1. How fast does water spread in a multifamily building?
Often within hours. Vertical migration through wall cavities happens faster than most people expect.
2. Can we wait for insurance approval before drying?
No. Most policies require mitigation to prevent further damage. Waiting often voids portions of coverage.
3. Why does a small leak cost so much?
Because hidden moisture requires controlled drying, monitoring, and sometimes demolition — not because of equipment alone.
4. Does insurance cover mold in California?
Usually limited or excluded. Most policies treat mold as long-term or maintenance-related.
5. Can maintenance staff handle drying?
Not when moisture is inside walls, floors, or shared assemblies. That’s where failures happen.
6. What documentation protects the HOA best?
Moisture maps, daily logs, photos, equipment logs, and signed access records.
Helpful internal resources
- Water damage restoration services in San Diego
https://www.clarketon.com/water-damage-restoration-san-diego/ - Emergency water mitigation case studies
https://www.clarketon.com/emergency-water-damage-mitigation-on-highway-101-in-solana-beach/ - Multifamily and HOA water damage examples
https://www.clarketon.com/water-damage-mitigation-reconstruction-in-a-below-grade-basement-del-mar-heights/