Sticker business is becoming more popular each year. In the time of quarantine, many small businesses appeared and have achieved great results. That is because stickers are products with a very wide market response. Everyone wants stickers on their glass cup, decals on the wall, stickers for planners, stickers for laptops, etc.
So if you want to start your sticker business and you are not sure where to start, what kinds of stickers there are, do you need a cold laminator, how to laminate them and make them waterproof, it will become more clear with the tips and tricks of this article.
Types of stickers
You have probably heard about die-cut stickers and kiss-cut stickers. But what is the difference? The only difference between those two is that kiss-cut stickers remain on the sheet and you pill them of it, while die-cut stickers are cut all the way through the sticker sheet. KIss-cut stickers are sold per sheet and die-cut stickers can be sold separately or in groups of several stickers. There are also decals which are basically vinyl stickers and they are waterproof because of the vinyl material that you use to make them.

Tools and materials for making stickers
To make stickers you need Circut or Silhouette cutting machine which comes in many different models and with its software for designing stickers. Next, you need a printer and paper to work with. If you want to make decals you don’t have to have a printer, since you would just use vinyl foil to cut with your machine. You can also print at a local printing shop or order printing services online and do just cutting. Or you can only design stickers and have sticker-making companies to the rest for you. If you are doing it all on your own you will also need sticker paper which comes as clear/transparent, white in matte or glossy, or vinyl foil which comes in many different colors.
How to laminate stickers?
What is the process of laminating stickers? It’s a process that makes your stickers waterproof which is very important if they are gonna be placed on cups, glasses, etc. It’s great to use it for water bottles and other products that will be exposed to environmental and body moisture. Laminating also makes the product scratch-proof, dishwasher safe, tear-resistant, keeps it from fading, and adds a fancy look to your stickers.
For this step, you will need a sheet of printed stickers and laminating sheet which comes with a matte, glossy, and satin finish. Keep in mind that a matte finish doesn’t reflect light, while a glossy one does very much so. For this tutorial, you want to use a single-sided laminating sheet.
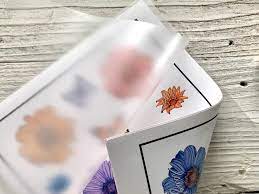
Once you printed your stickers, leave them to dry for 5 minutes. After that, you need to peel the backing of laminating sheet and place it on top of your stickers, making them face each other. Be sure to keep laminating sheet inside of registration lines (black lines around your design). When you find the right place for the laminating sheet, press evenly. Press firmly to avoid bubbles from appearing and to achieve as neat placement as possible. If bubbles do appear, you can squeeze them out with a credit card, ruler, or piece of cloth.
Then, pull 2-3 inches of sticker backing (white part of the stickers sheet) just so much so that the laminator can pull it in. Put it all together into the laminator and watch as magic is happening. Be sure to hold your sheet because it’s sticky and you want to prevent it from sticking to anything else.
Once this process is done, the sheet is ready to be placed on a sticky mat. Put the mat back into your cutting machine and choose a fitting setting and cut with a fine point blade.

Before removing the mat from the cutting machine, make sure that stickers are cut all the way through. Carefully peel off the excess sticker paper and hold your mat so your stickers stay flat. If you want to try to do all of this with a retractable craft knife, you can try for some basic shapes.
If you’re ready to start your sticker business and want to get the best laminator possible, here’s the list of laminating machines for home. In sticker, business time is everything so it’s very important that your laminating machine heats up fast. Also, cutting speed is something to pay attention to. How much you can produce in a day depends on those factors. Make sure that the working surface of the laminating machine matches your cutting machine mat size. If the mat is bigger than your laminating machine it will be useless.
When you’re just starting with one or two machines noise is not such a problem, as it becomes when you expand so maybe you want to choose a less noisy cutting and laminating machine. Some laminators come with a fancy corner rounder which is not necessary but it is a nice bonus.
Designing, cutting, and laminating stickers is a tricky business, so don’t lose your patience. Just keep practicing. It’s always harder at the beginning but it gets easier in time.


